Sunday, November 29, 2009

Little Princess' Birthday

Hello everybody :) So glad you stopped by today. This is my first post since before Thanksgiving. It feels like forever. I hope you had a great Holiday. Do you know that we didn't have the first turkey at any meal we attended? I don't know how this happened but when people were asking us after Thanksgiving if we were tired of turkey we could honestly say...NO! We never got the first one! Oh well, I'm sure we'll get plenty at Christmas. I'm going to be sure to do one myself :)
I took a break from Christmas cards to make a Birthday card for my niece who turns 1 Saturday! She is so sweet...the prettiest blue eyes you've ever seen! Pink and Brown are some of the cutest colors on her so I decided to make her Birthday card with those colors.


This is also my card for Crazy 4 Challenges this week (use punches).
I used pixie pink c/s as my base. The patterned paper is SU! sweet always (retired). The image is Sugar Nellie. I used watercolor pencils, blender pen and Bic MarkIt Markers to color her. I'm not too good at shading or blending yet...still workin' on that. The senitment is computer generated. I used choc. chip chalk on the sentiment and on corners of the image. Sheer chocolate ribbon on one punchie. I don't have the 2 slit ribbon punch so I used my 1/16" hole punch and 'made' my own slits to thread the ribbon through.
Thanks again for visiting and please leave a comment and let me know what you think :)
Until next time...
Blessings...

Tuesday, November 24, 2009

3 of a kind

Hi bloggy ladies!
I've got one more post before Thanksgiving. There's so much to do before Thursday and on Thursday....it's a little overwhelming but I know everyone else has the same or more going on too.
Thanks to the ladies in my blog group for telling this airhead how to schedule a post. duh....I'm so lame sometimes! I love being able to schedule a post. You can take care of a week's worth of posts in one day (even a month's worth if you're feeling sassy!). I'm trying to post every other day. It feels good to keep my blog updated. :)
So, the title of my post is 3 of a kind. I, as you know if you've been following, am working hard on Christmas cards. I started one of these cards and when I finished, I wondered how this same layout would look with different colors/designed paper. So, here's what I came up with:


1) Elegant Christmas: Grey bazzil c/s, white c/s, black c/s, rhinestone brads, 2 square punches, scalloped oval punch, lg. oval punch, tiny hole punch (the one for brads), fundamental phrases stamp set, sheer grey ribbon, basic black ink.

2) Fun & Modern Christmas: White c/s, real red c/s, snowflake patterned paper, green galore c/s, 2 square punches, scalloped oval punch, lg. oval punch, tiny hole punch, fundamental phrases stamp set, real red ink, green galore ink, sheer grey ribbon


3) Traditional Christmas: Old olive c/s, real red c/s, merry moments DSP, choc. chip c/s, very vanilla c/s, choc. chip ink, 2 square punches, scalloped oval punch, lg. oval punch, tiny hole punch, twine.


This was a great way to get quite a few cards made without having to think of how to lay them out. The sentiment is on with dimensionals. The ribbons and twine are pulled through like you would do a tassel on a bookmark. Sorry, I don't know if that has a proper name.
Thanks so much for stopping by. I hope you have a great Holiday week!

HAPPY THANKSGIVING EVERYONE!
Until next time...
Blessings...

Sunday, November 22, 2009

Snowflake Season....oh yeah and some candy too!

Hello everyone! Hope you're all well. I have some news!!!!!!

I have my first blog candy giveaway posted in my sidebar!!!!
Be sure and check it out and become a follower to get your name in the hat :)
~~~~~~~~~~~~~~~~~~~~~~~~~~~~~~~~~
Now on with my creation of the day. I did this card for the Featured Stamper Challenge on SCS today. I love the layout of this card. It's simple....my favorite...but I think it makes a statement.


I stamped the snowflakes from Season of Friendship set and the little one from Snow Swirled set, then punched them out and sponged on them with Soft Suede ink. I stamped the tree with basic black ink then sponged it with Soft suede ink as well. A few layers, some handdrawn lines and a sentiment from Christmas Greetings set...oh yeah and a little twine...and you've got a simple Christmas card.
Well, off to evening service at church.
Thanks for stopping by.
Until next time...
Blessings...

Friday, November 20, 2009

A Crackled Dasher

It's finally Friday! Yay!!!
I hope and pray everyone has had a great week.
Thank you for visiting me. I appreciate it greatly.
Today's Christmas card is Clean and Simple. I've used one of my favorite colors SU! makes...Old Olive. I just adore this color. I've also used one of my favorite stamps (right now of course, after the Holidays I'll come up with a new favorite!)...Dasher! Isn't he the prettiest little reindeer you ever did see?


I started with Old Olive then built on it with paper from the Merry Moments DSP pack. I then used real red c/s. I stamped Dasher in Chocolate Chip ink on some 'crackle' paper I had in my stash (scrap folder). I really like how it turned out on that patterned paper. It gives the card an older vintage feel. I stamped 'Merry Christmas' in Real red ink. Finished it off with some misc. cream colored buttons. This was very simple to make. I love those kinds of cards!
I'm getting a lot of Christmas cards finished! I like making progress don't you? I hope this gives you some inspiration for your next Holiday project.
Have a great weekend!
Until next time...
Blessings...

Wednesday, November 18, 2009

Pink Holidays

Hello all my bloggy friends! I hope you're having a great week and all is well.
I've got a very simple card to share with you today.
WARNING: if you don't like pink, don't scroll down! hee! hee!
This card is for a CAS (#41) challenge on SCS. It was an inspiration challenge...inspiration coming from Vera Bradley. I love her bags/products. Of course, this card doesn't do her artwork justice but...anyway:


Yes, yes, I'm doing lots of non-tradional Christmas cards this year. I don't like limiting myself to red and green only. This card is pixie pink c/s with sheer white ribbon gathered at the top (here's another warning...it's a pain trying to gather ribbon at an angle!). I stamped the snowflake from Season of Friendship stamp set (SU!) all over the c/s with WW craft ink. Then I cut out a piece of basic black c/s to curve with the ribbon. I punched basic black c/s with my scallp oval punch then a piece of WW c/s with the lg. oval punch then stamped another snowflake in basic black ink (I adhered the 2 punched pieces together first then cut in half, then stamped). The sentiment is from the Snow Swirled stamp set (SU!).
One more Christmas card down only about 30 to go!!!!! Ugh!!!!! Oh, well at least it is something I really enjoy doing. :)
Until next time...
Blessings...

Monday, November 16, 2009

Lighting up the Holidays!

You're either going to get some ideas from me for Christmas Cards or you're going to get sick of Christmas Cards by visiting my blog! I hope you get ideas...b/c I've got lots of Christmas cards to finish and not a lot of time to create anything else.
I went very 'busy' with this card and used lots of layers.


My colors are real red, green galore, and misc. Christmas lights paper. I used the Snow Swirled stamp set from SU!. I stamped the sentiment on the pp and then chalked around it. It didn't turn out like I'd hoped...but it's okay. I used the White gel pen around the 'bulbs' and on the sentiment and image. 3 red buttons and some green thread to finish. The image and panel are popped up on dimensionals.
Well, now to go fold clothes and get kiddos out of the bath!
Until next time...
Blessings...

Friday, November 13, 2009

Friday the 13th and Christmas cards?

Happy Friday the 13th everyone! I think since it is a 'spooky' night, I'll get my wonderful husband to bring home something for supper. You know I might just burn myself in the kitchen with it being Friday the 13th! Or something terrible might happen. :) You think he'll buy it? ha! ha!
So, I'm trying to get all my Christmas cards made before Thanksgiving. I'm slowly but surely putting a dent in the 50 I want to get made. My problem is I don't want to make them all the same! I like variety. I just don't know how many more designs I can come up with for Christmas. Here's 2 more I've finished. This first one is very non-traditional.


I love the simplicity of it. The snowflake is from Season of Friendship stamp set from SU! I used basic black as my card base and whisper white c/s. Used my circle cutter after stamping the snowflakes and put a brad in 3 of them. I popped them all up with dimensionals. And yes, that's a written sentiment...don't faint! I know that's a cardinal sin to some to handwrite on the fronts of their cards, but I just couldn't find a sentiment stamp I wanted to use so, I used a white gel pen and wrote it myself. :)
Next card is a little more traditional but still not totally in the red and green category.

This one I used a misc. snowflake patterned paper. I stamped the tree from my Snow Swirled stamp set from SU! and then punched it out. I punched out scallop circles from grey bazzil c/s, then used my white gel pen again for the dots. I used red sheer ribbon, tiny grey sheer ribbon & white sheer ribbon. The grey ribbon is wrapped around a few times and then tied beside the circle. I cut a piece of grey bazzil c/s and stamped my sentiment. I curled up the tip edges too. The scalloped circles are popped up with dimensionals. Ink used were Real Red, Bashful Blue and Pixie Pink.
Thanks so much for stopping by!
Gotta go make that call to my hubby!!!!! hee! hee!
~~~~~~~~~~~~~~~~~~~~~~~~~~~~~~~
Until next time...
Blessings...

Wednesday, November 11, 2009

Crafty Critters Challenge #11

THANK YOU VETERANS FOR ALL YOUR DEDICATION AND SERVICE TO OUR COUNTRY. MAY GOD BLESS YOU!

Hello everyone! We're out of school today....Yippee! Which means I'm off work...which means I get to craft today!!!! My house is about 80% clean (hee!) so I say that gives me some crafting time. Don't you think? *wink*

This is my card for our Crafty Critters Challenge #11
We had to use sketch240 from SCS.
We couldn't use red or green.
We had to use stickles and ribbon.
Had to be Christmas themed
I think I covered all the requirements.
Here's mine:


The image is a digi from Dustin Pike. This is one of 30 images I got from him when I donated some cards to a Children's Hospital he was giving to.
I started with grey bazzil c/s and inked around it with basic black ink. The bottom panel is a piece of misc. snowflake paper, then basic black c/s. I 'snowed' the black c/s with white chalk then placed a piece of sheer white ribbon over that. The snowflake is cut from that misc. snowflake paper. I inked around the image with basic black ink. I colored the image with my Bic MarkIt Markers and used stickles on the Snowman's smile and at the bottom of him. His rosey cheeks are Pretty in Pink chalk. The sentiment is from a clear set I got from QVC, stamped in basic black, cut out and popped up. The image is also up on dimensionals.

I'm off to stamp some more! Yay! I rarely get a day that I can dedicate to crafting. I'm taking full advantage :)

Until next time...
Blessings...

Monday, November 9, 2009

Beautiful Christmas Ornament

Hey everyone! I'm getting ready for a Girl's Night so I'll have to be short.
This project is actually something my mom made. About 5 years ago I got my mom interested in scrapbooking. She was not sure about it at first but she is an excellent scrapbooker now and she does all kinds of paper crafting projects. She does way more 3D projects than I do. I admit I need to do more.
This is an ornament she made me.


The pic is of my daughter (she's lying down that's why her face looks flat on her left side hee!)
Mom used chipboard as the base, covered it in patterned paper (front and back). She cut out an oval shape and cut the picture using her CM cutter. She used her Martha Stewart leaf punch in the corner and a fabric flower and a rhinestone center. Punch a hole in the top and thread a piece of ribbon through. I think it turned out amazing! Thanks Mama!!! :)
Oh and ladies I finally got around to buying a new camera. I believe it takes great pictures. What do you think?
Gotta go finish getting ready.
Until next time...
Blessings...

Monday, November 2, 2009

Way too Easy Christmas Projects

Happy Monday!
This evening I've been working on some card sets. I'm making them for a Ladies Luncheon we're having Saturday. The ladies from my church will get together at the local Holiday Inn and have lunch and doorprizes and devotion and chit chat and...you get the picture.
My Pastor's wife ask me if I would make some card sets for doorprizes and of course I was very excited to say yes!
I'm going to make 3 sets of 5. The first set will be 5 assorted Thank You cards. That was the easy set to put together. I used cards I had already made. Easy, Easy. The next set is 5 Christmas Cards.
Here's what they look like:


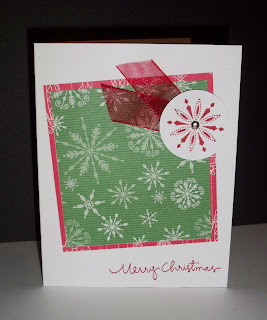
These are very simple. But, I thought a very sweet layout. This is a 4.25"x5.5" card. The patterned paper is cut at 3.5"x3.75" and 3.25"x3.5". I stamped Merry Christmas on the card base. The snowflake is stamped on white c/s and a brad in the middle. I used dimentionals to adhere it to the card. The ribbon is tucked behind the snowflake using glue dots. I made 6 of these cards (1 for myself of course!) in about 20 minutes! Too Easy! I'll have the last set done tomorrow night and try to have them uploaded by the weekend.
Supplies:
Cardstocks ~ White
Patterned Paper ~ Merry Moments (SU!)
Stamp Sets ~ Christmas Greetings (SU!) and Snow Swirled (SU!)
Ink ~ Real Red (SU!)
Brad is from the Vintage set from SU!
Ribbon is from Wal-Mart, Sheer Red

This next project I made at my Demo meeting last week. After making this, there's no doubt I will be buying some candles and making some great Christmas gifts. This is Super Easy to do:


This is a Dollar store candle. You stamp on tissue paper. Cut around the image. Lay the image on the candle where you want it. Wrap wax paper around the candle and hold in place. Use your heating tool (the one you rarely use to emboss with, you remember it? hee!) and hold it about 2" from your candle. When you see the tissue paper edges start to disappear (moving heating tool around) it's done. Remove wax paper and you have a Super Easy project to give as a gift or keep to decorate your home! I'm going to try this with non-Christmas stamp sets and different size candles and maybe make "sets" of candles to give as gifts for the Holidays. I'll be sure and post them.
Supplies:
Dollar store candle
White Tissue paper
Wax paper
Heating tool
Scissors
Stamp set ~ Dasher (SU!)
Ink ~ Chocolate Chip
~~~~~~~~~~~~~~~~~~~~~~~~~~~~~~~~~~
Okay, long post is over! Have a great week everyone and thank you soooo much for stopping by! :)

Until next time...
Blessings...