Showing posts with label Halloween. Show all posts

Tuesday, October 15, 2013

Twisted Dueling Darlings Post!

Hi all!

I have 2 things to share with you today.

My Dueling Darling post
and my
Twisted Tuesday post

The thing is.....I have 1 project for both! :) LOL

This month Sweet P (Paola) is our hostess for the Dueling Darling Dazzlers.
She sent us the cutest little Halloween kit. Even though I don't send Halloween cards and we don't celebrate the "scary" side of Halloween.....I do love the kit and made some little treat bags with it!

Yep, that's my project share for this Dueling Darling challenge. Judy (hostess of the Divas) and Sweet P asked us to share something we do/make for Halloween. I usually end up making a few treat bags for school events. :)
 

This is also what I made for today's Twisted Tuesday challenge.
We were to make a celebration themed project with a natural element (hemp twine).
The Design team at TT outdid themselves this time! Be sure to check it out!

Supplies:
Stamps (all from SU) : "Haunting Halloween" (cat, cauldron + 2sentiments)
"Booglie Eyes" (mummy) & "Best Fiend" (sentiment)
D/P :     Wicked Fun (SU); Halloween Characters & Small Dots (both from Michaels)
Black w/ silver thread (handmade DP from Costco)
Accessories : 'Boo To You' (CB folder) ; 'Black Bat's (Sizzix Die) ; 2 Halloween ribbons (Michaels) ;
1 XLrg orange brad by Elements/Am. Crafts ; sm. spiders from Recollections ; 
pumpkins dimentionals stickers ;
2 sets of Googlie eyes (Dollar store) ; 'Bootiful' brads from Sprinkles
glassine bags: Scrapbooking with M.E. Boutique
hemp twine: Wal-Mart

Thanks so much for stopping by my blog today!

Until next time...
Blessings...

Melina
 

Monday, October 31, 2011

Watch Out For.....

Black Cats.....
(our daughter)


Crazy College Football Fans......
(our son)


and Giraffes?!!.........
(our niece)


This Halloween!

I made Bethany's cat ears and painted her face. She thought that was the grandest thing. When our niece came by, she wanted her face painted and cat ears too! My sister said she's just gonna have to start checking with me each Halloween to see what Bethany's going as and let Presley go as the same thing! hahaha I went ahead and did it for her. She left with a cat head and giraffe bottom! *giggle*

Happy Halloween!
Oh and enjoy the candy but don't get a tummy ache! :~)


Blessings...


Melina

Thursday, October 20, 2011

My First Step by Step Tutorial!!!!!

Align Center**>>First off the project I am making in this tutorial is not a brand new idea. My project is a little bigger than the original and doesn't use ribbon<<**
I got this idea from AnnMarie's blog. Hey girl! Here's the link to her post....Boo
She lists in her post where she got her idea from.

I made a Candy Corn Treat Box. In AnnMarie and Heather's posts they used ribbon as a handle for the treat box. I am very stingy with my ribbon and wanted to find a way to make this cute as can be box without using my wonderful ribbon.
So here goes....

First get a 12x12 piece of basic black c/s. Cut it in half at 6" then fold it in half. Then with the open end facing up, make a mark at 3". (see pic)(I made my mark with my Scor Pal tool.

Then with the c/s folded, place it on your cutter lined up with the 3" mark and one of the corners. Score a line on that diagonal. Then do the same to the other diagonal.

Then flip it over and do the other side.
Put the black piece to the side and get out pumpkin pie c/s, daffodil delight c/s and white c/s.

Cut the pp c/s 2"x6.25". The DD c/s 2"x4.75". And the White c/s 2.25"x3".

This is a triangle box. Adhere two of the flaps (see pic for where to place adhesive on flaps) to the outside of the other flaps.

After you adhere the flaps, your box should look like this.

Now, adhere your c/s strips to the front of the box. **MY ORANGE AND YELLOW ARE BACKWARDS!!!! ON A CANDY CORN THE YELLOW IS THE TOP AND ORANGE IS THE MIDDLE. JUST SWITCH THE CUTS ON THE YELLOW AND ORANGE TO FIX!!!**

....Leaving overlap as shown in above pic. Cut the strips around the box, leaving overhang and round the corners, I just did this freehand.

I used a sponge dauber and inked the edges of my candy corn then made some doodles around the edges.

I drew on a smile with 2 weird looking teeth (filled in with white gel pen). You will do much better teeth, I know! The eyes are done with the circles on the SU! owl punch. I glued them together with tombow adhesive.

You treat box is complete! Now, all that's left is to fill it with candy. The slot at the top is large enough for smarties, nugget Hershey's, peppermints, jaw breakers, anything small like that.
To give you somewhat of a measurement, the box holds a good handful and a half (my hand that is) of candy. The way to fill and empty this box reminds me of those coin pouches from long ago. You know the ones you could squeeze the ends and it opened like a mouth? Same concept with this box....press slightly on the front and back (at the top, white part) to make the opening wider. Turn it over and shake out your treat!
I hope you get to make some for Halloween!
Well, this concludes my very first step by step tutorial. How was it? Easy, hard, uninteresting? Give me your feedback, please. Let me know how I did.
Thanks so much for visiting my blog today.

Until next time...
Blessings...

Melina

Sunday, October 24, 2010

Lots of Coloring!

For all of you that know me and my crafting style, you know that I don't do a lot of coloring. Well, not the case with this Halloween card. I don't know what got into me but I like it! :)

I'll be entering this in the Really Reasonable Ribbon's Halloween Challenge (#10)
Go take a look! They have some great prizes!!!


I used the great new set from SU!, Fang-tastic. I don't have any Halloween sets. I DO NOT do the scary Halloween thing, only "cutesy" so this is the perfect set for me.
I made the "dirty hills" and then stamped the cat, pumpkins and bat. I stamped, colored and cut out the cute little trick or treater and her goodie bag and popped them up on dimemsionals. I colored my scene with watercolor pencils, SU! markers and a blender pen.

Thanks so much for stopping by!

Until next time...
Blessings...

Melina

Friday, September 10, 2010

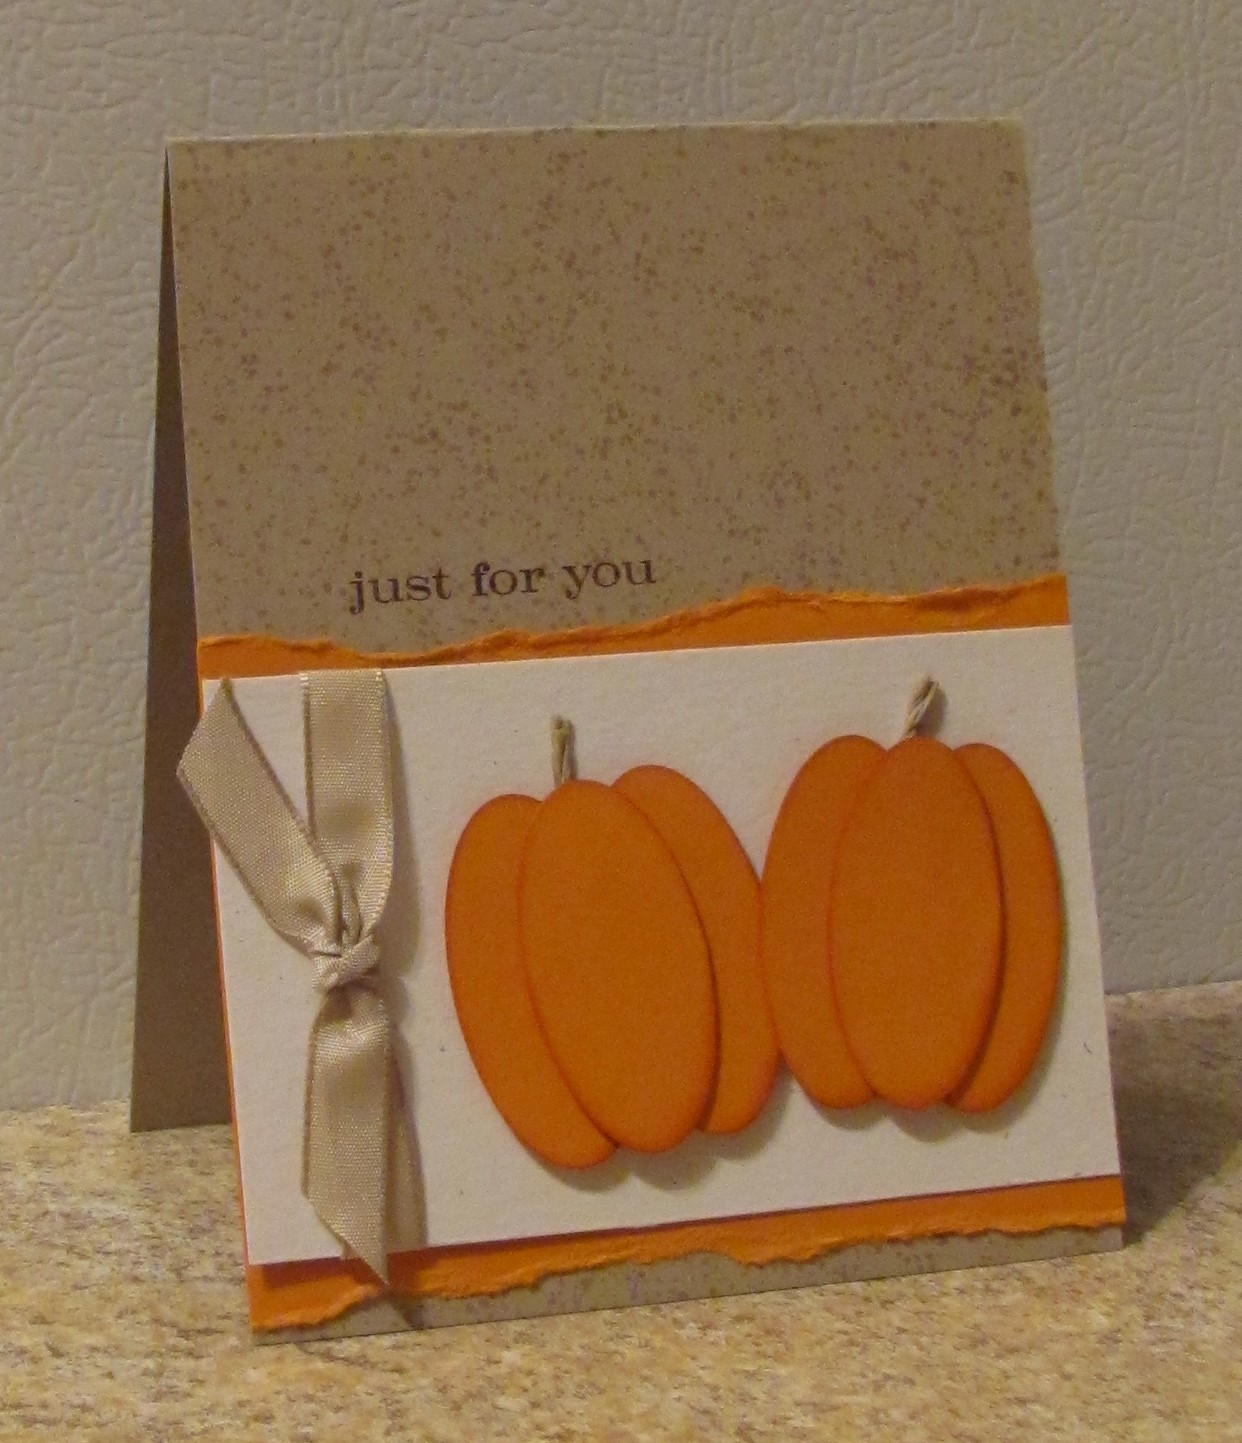
Couple of Pumpkins

Hey people! ;)

I'm getting more and more into punch art with my paper crafting. Slowly but surely I would love to start making those cute creatures/animals/people I see crafters making.....some day maybe.
But, today I'm sharing some easy, easy punch art!


Who among you have not tried the oval punch pumpkins? If you haven't you need too. They are super easy and super cute! For the stems I cut 3 pieces of hemp twine and twisted them together with a dab of tombo adhesive. The card base is Crumb Cake with the splatter stamp from Itty Bitty Backgrounds stamped all over in chocolate chip ink.

Supplies:
Paper ~ Crumb Cake, Pumpkin Pie, Natural White
Ink ~ Pumpkin Pie, Chocolate Chip
Stamps ~ Itty Bitty Backgrounds, Just Believe
Accessories ~ Sponge daubers, kraft ribbon, hemp twine

Hope you like my creation today! Also, hope you're enjoying some cooler temps like we are! Yay! I'm lovin' it :)

Until next time...
Blessings...

Melina

Wednesday, September 8, 2010

Craft Show Projects Part 2

Hiya!

I've got quite a few things to share with you today. If you've been reading my blog, you know I'm trying to get ready for a Craft Show this Saturday....yeah, this Saturday!!! Yikes! I've never had a booth at a Craft Show and I'm very anxious. I don't know if I'm making too much and too many or if I'll wind up making lots more through out the day. Of course, I hope it's the latter. I'm taking most all my supplies, even my Big Shot and dies so I hope to be able to "demo" lots of things as people walk by and visit. The CS I'm going to is a first for the town. It's a neighboring town about 20 miles away. So, I'm not sure what kind of crowd to expect. I'm hoping I get lots of new SU! customers from this though.

Here are a few projects I've been working on this week to take:

If you have not ordered the new punch from the Holiday Mini....WHAT ARE YOU WAITING FOR? This punch is a must have! I've used it A LOT since I've gotten it. It is a perfect size for little tags.....whether it be for goody bags or on gifts. I used the SU! stamp set, "Fang-tastic" for these tags and the 4x6" cello bags (SU!). The string is crochet thread.


Simple, Easy, peasy!!!! Christmas card! I used the SU! set "Christ is Born". The ink colors are Cherry Cobbler and Old Olive.


This is one of my favorite cards I've made for the show. I used the SU! set, "Jolly Bingo Bits". The card base is bashful blue then a panel of old olive c/s that I punched with the scallop trim border punch. I stamped the images with real red, bashful blue, old olive and chocolate chip ink and punched them out. The sentiment is stamped in real red ink (SU! Bright Christmas set)


Kickin' it old school with this card. This is the layout I used with the very first SU! card I ever made.....stamping the images on the top and putting a piece of c/s or dsp on the bottom....VERY, VERY, EASY!!! This card also uses the Jolly Bingo Bits set and the Bright Christmas set. The ink is certainly celery, real red and old olive and the ribbon is certainly celery grosgrain.

Thanks so much for visiting today!

Until next time...
Blessings...

Melina